
How to use Overledger on Zapier
Introduction
A quick-start guide to using Zapier can be found here.
The Overledger App on Zapier has available triggers and actions.
All of the triggers and actions fall into two main categories:
1. Reading Data
Overledger allows data to be read from the blockchain. Currently, in the Zapier Overledger app, users can read data from specific smart contract functions.
2. Monitoring Data
Overledger allows for the possibility of monitoring either
- Smart contracts for event firings
- Blockchain accounts for when a transaction is sent to or from a particular address.
In the Zapier Overledger app, users can create, read, update, and delete webhooks for monitoring both smart contracts and blockchain accounts.
Available Overledger Instance, Technology and Network Combinations
Each Zapier Overledger trigger and action requires you to define the Overledger Instance, the Blockchain Technology, and the Blockchain Network to interact with.
The currently available options on Zapier are listed in the following table:
| Overledger environment | Technology | Network |
|---|---|---|
| Sandbox | ethereum | sepolia testnet |
| Sandbox | ethereum | goerli testnet |
| Sandbox | ethereum | polygon mumbai testnet |
| Sandbox | ethereum | avalanche fuji testnet |
| Sandbox | ethereum | xdc apothem testnet |
| Production | ethereum | ethereum mainnet |
| Production | ethereum | polygon mainnet |
| Production | ethereum | avalanche c-chain mainnet |
| Production | ethereum | xdc network mainnet |
As you can see, the Sandbox Overledger instance allows you to connect to test blockchain networks (which hold no real-world value tokens), whereas the Production Overledger instance allows you to connect to the main blockchain networks (which hold tokens with a real value).
Zapier only supports the Ethereum blockchain technology. In the future additional technologies can be added to the Zapier integration if required.
Reading Data from a Blockchain
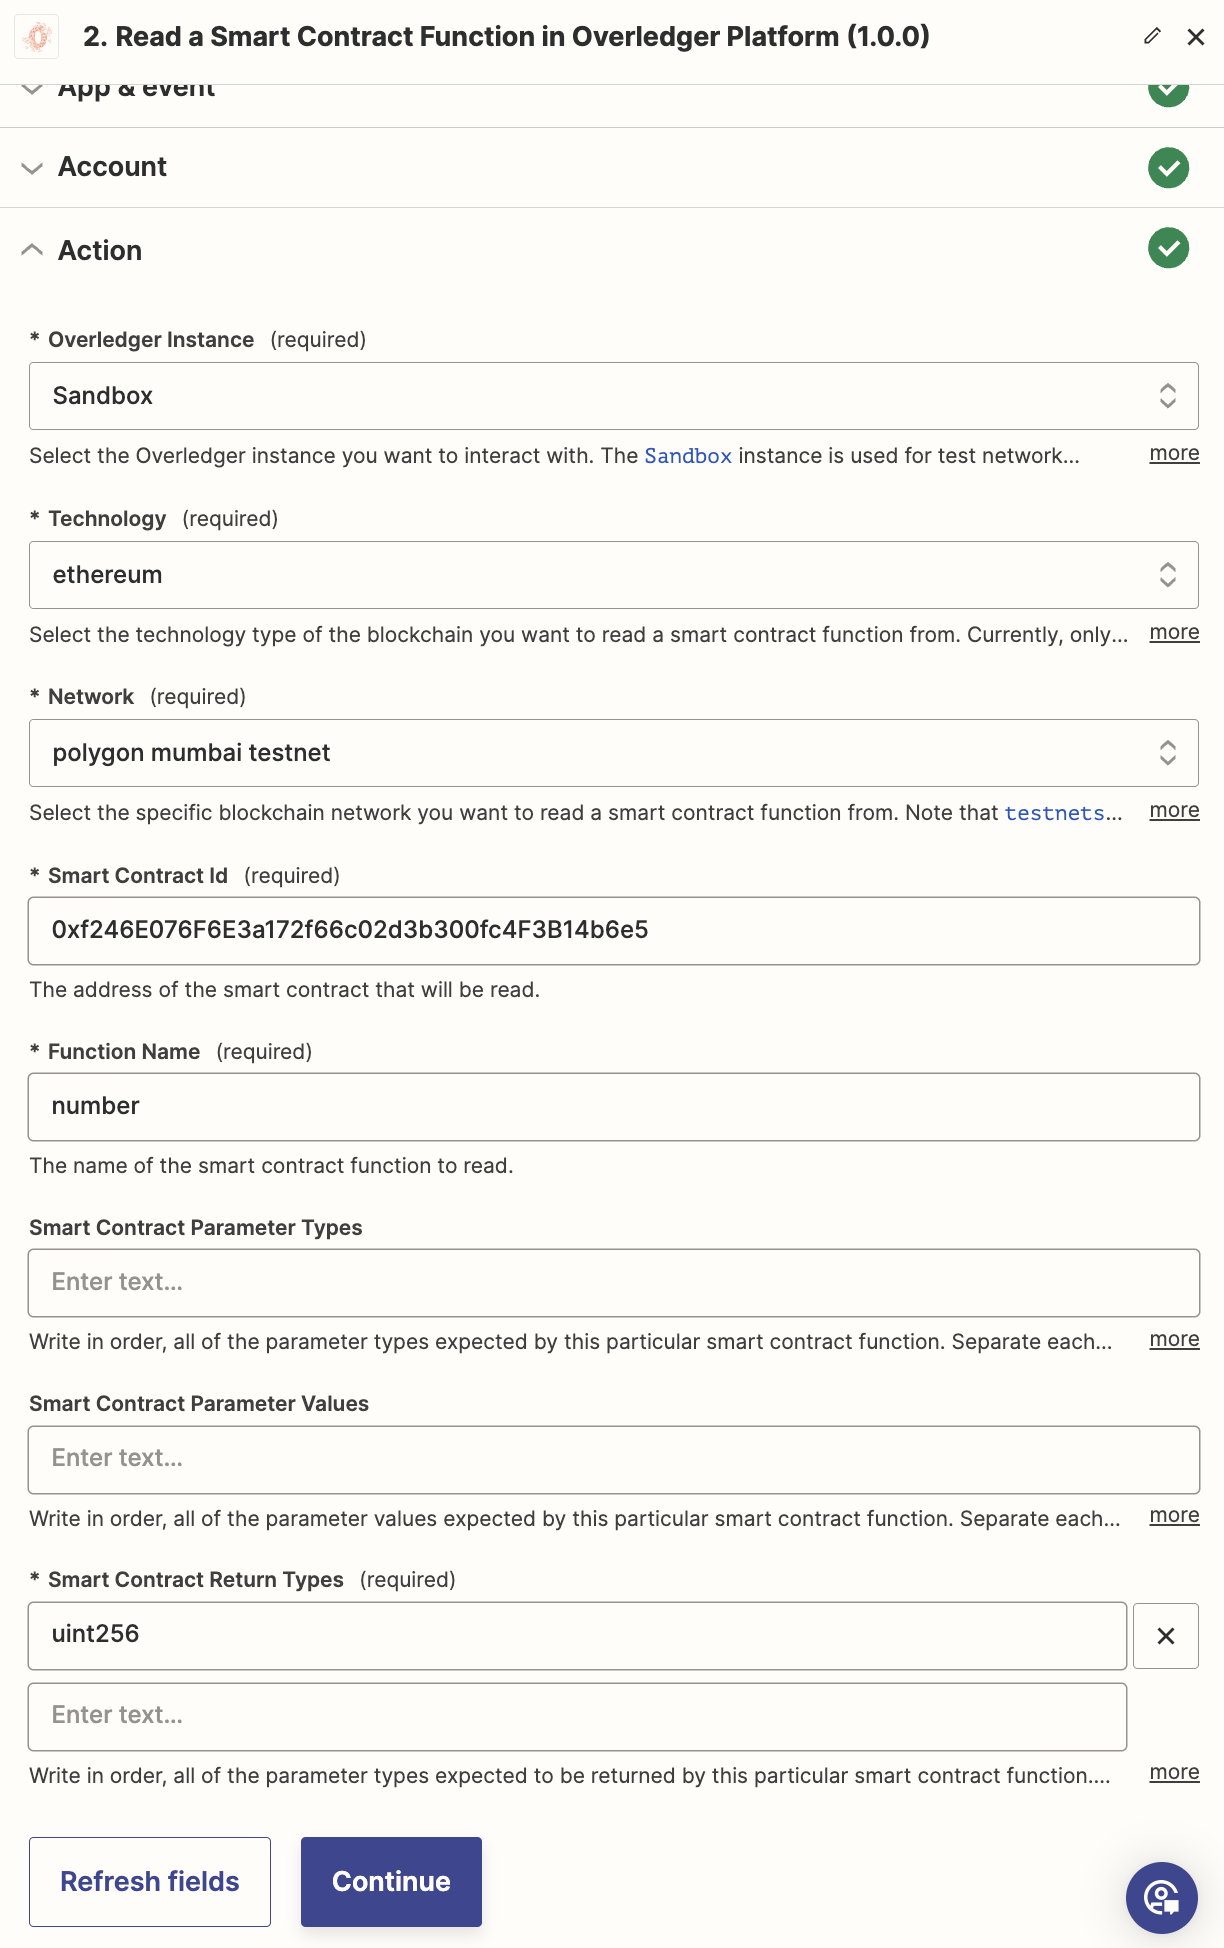
Reading data from a blockchain can be completed in one Zapier action in the Overledger app, called Read a Smart Contract Function.
Once you have selected this action and the Overledger platform account you will be using, then you should fill in the action input fields, which we describe below:
Select the Overledger Instance, Technology and Network
The possible options are listed above.
Select the Smart Contract Identifier
Overledger requires you to define the specific identifier of the smart contract you want to read from. For Ethereum technologies, this identifier is equal to the contract's address.
Select the Function Name
Overledger requires you to define the specific name of the smart contract function you want to read.
You will have to look at the smart contract code to understand the functions available for this contract. Potentially you will have the code available to you locally. Or you will need to go to a block explorer and search for that particular contract identifier and look at the code in the block explorer - if it is available.
Smart contract code might not have been uploaded to a block explorer as this is a manual and optional process conducted by the creator of the smart contract.
For example, we can see in the polygonscan block explorer here, that possible read function names include: (a) number; (b) readOneAInputOneAOutput; (c) readOneUIInputsTwoUIOutputOneTwoEight; (d) readTwoSInputsOneSOutput; and (e) readTwoUIInputsTwoUIOutputs.
Understand the Function's Input and Output Parameters
Overledger requires you to define the input and output parameters of the smart contract function you want to read from.
Each input parameter needs a type and value parameter. Whereas each output parameter requires a type parameter.
For each Ethereum technology based network, Overledger supports the three core Solidity described here:
- Basic Types: uint, int, string, address, bool, bytes, any of the following {uint8,uint16,...,uint248,uint256} and any of the following {bytes1,bytes2,...bytes31,bytes32}
- Dynamic Array Types: uint[],int[],string[],address[],bool[], bytes[], any of the following {uint8[],uint16[],...,uint248[],uint256[]} and any of the following {bytes1[],bytes2[],...bytes31[],bytes32[]}
- Fixed Array Types: uint[X],int[X],string[X],address[X],bool[X],bytes[X], any of the following {uint8[X],uint16[X],...,uint248[X],uint256[X]} and any of the following {bytes1[X],bytes2[X],...bytes31[X],bytes32[X]}, where X is an unsigned integer.
For example, we can see in the polygonscan block explorer here, that possible read function options include:
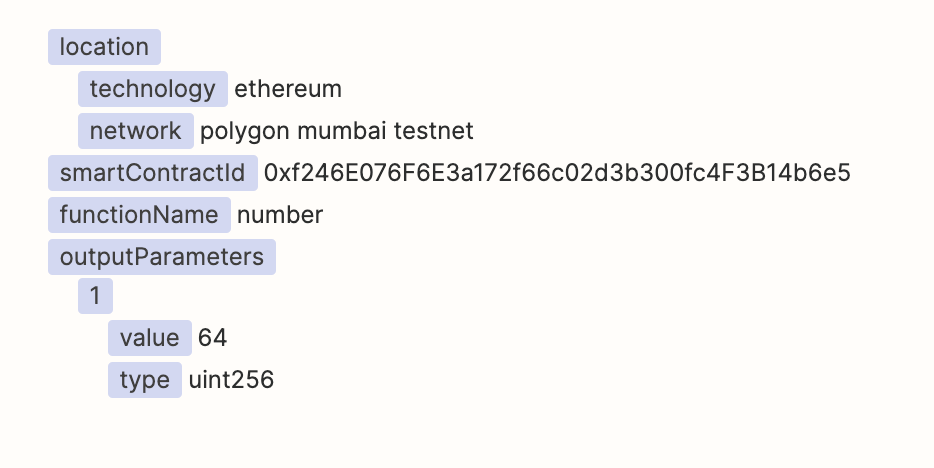
- (a) the number function - requiring no inputs and one uint256 type output;
- (b) the readOneAInputOneAOutput function - requiring one address type input and one address type output;
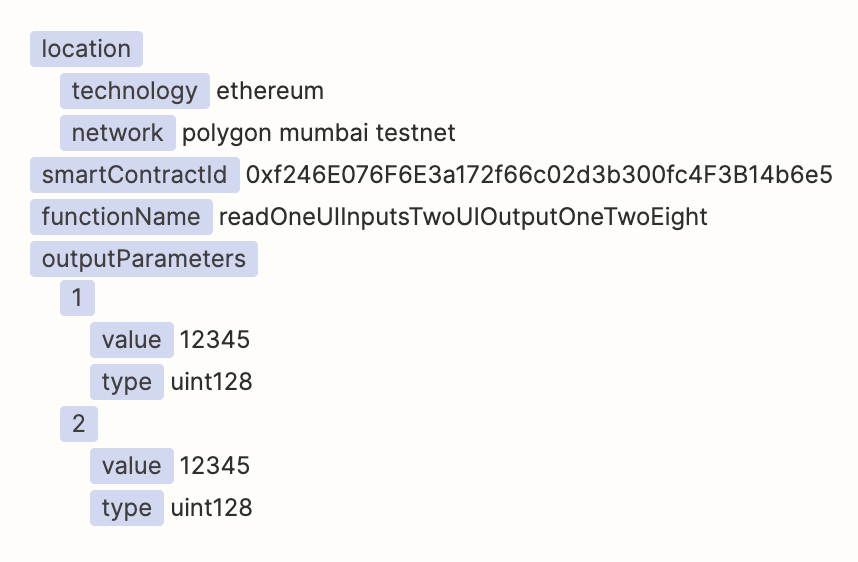
- (c) the readOneUIInputsTwoUIOutputOneTwoEight function - requiring one uint128 type input and two uint128 type outputs;
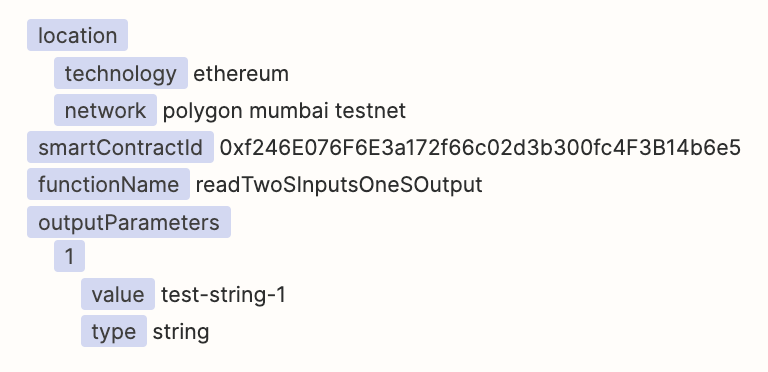
- (d) the readTwoSInputsOneSOutput function - requiring two string type inputs and one string type output;
- (e) the readTwoUIInputsTwoUIOutputs function - requiring two uint type inputs and two uint type outputs.
Example Request and Responses
This Zapier Overledger action for reading smart contract data relates to the Overledger Platform API found here.
Below, we provide screenshots of example smart contract reads through Zapier.
The contract used for testing is a simple one where all the read functions have very basic functionality - to return the same value as given in the input.
(a) number - requiring no inputs and one uint256 type output.
Input Fields example:
(a) number - requiring no inputs and one uint256 type output.
Response body example:
(b) readOneAInputOneAOutput - requiring one address type input and one address type output.
Input Fields example:

(b) readOneAInputOneAOutput - requiring one address type input and one address type output.
address type input and one address type output.Response body example:

(c) readOneUIInputsTwoUIOutputOneTwoEight - requiring one uint128 type input and two uint128 type outputs.
Input Fields example:

(c) readOneUIInputsTwoUIOutputOneTwoEight - requiring one uint128 type input and two uint128 type outputs.
Response body example:
(d) readTwoSInputsOneSOutput - requiring two string type inputs and one string type output.
Input Fields example:

(d) readTwoSInputsOneSOutput - requiring two string type inputs and one string type output.
Response body example:
e) readTwoUIInputsTwoUIOutputs - requiring two uint type inputs and two uint type outputs.
Input Fields example:
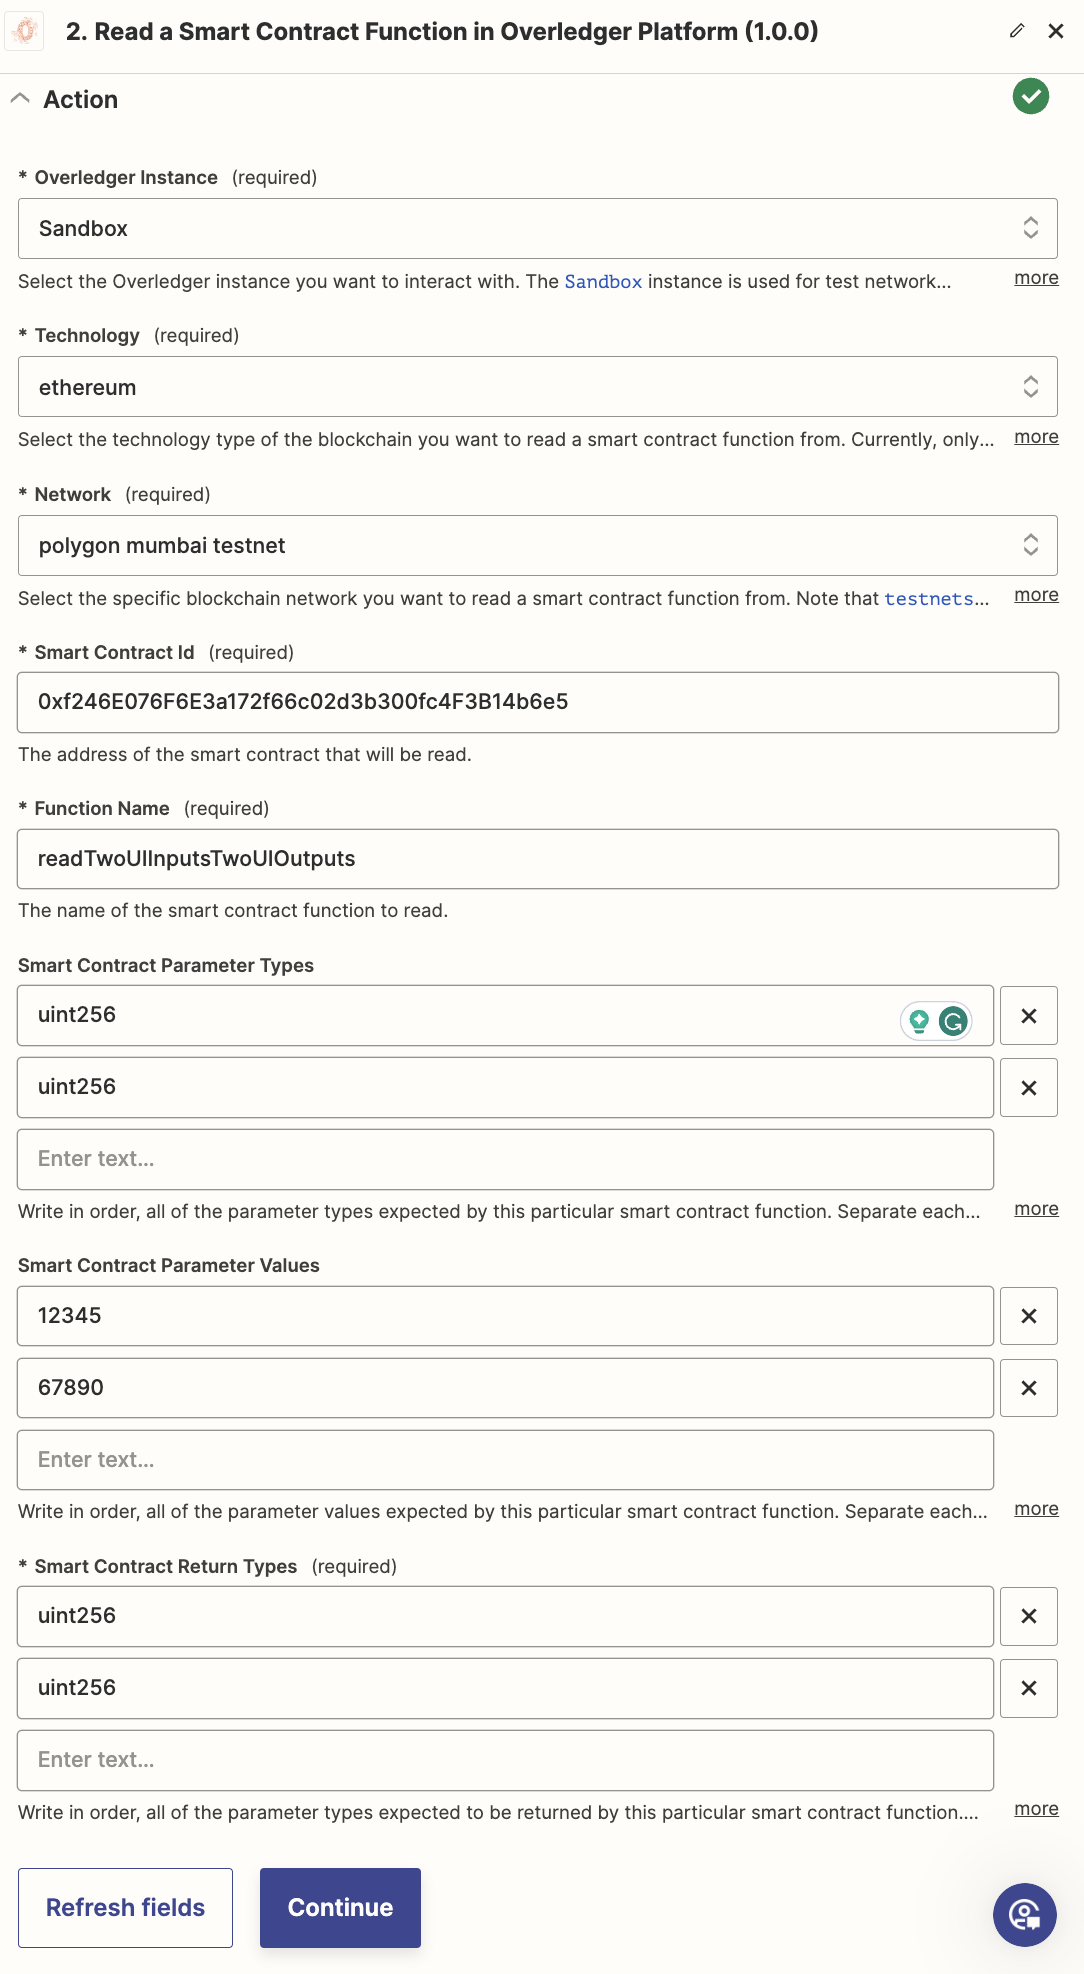
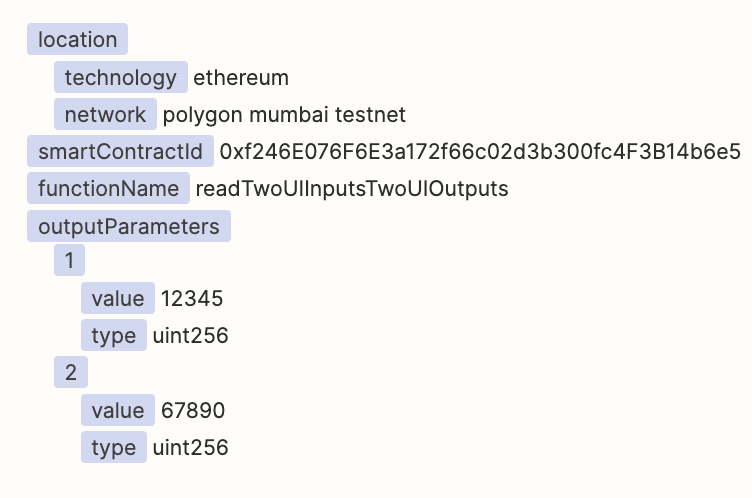
(e) readTwoUIInputsTwoUIOutputs - requiring two uint type inputs and two uint type outputs.
Response body example:
Monitoring Data on a Blockchain
Registering to monitor a smart contract or blockchain account can be completed in one Zapier action, called Create a Webhook in the Overledger app.
Once you have selected this action and the Overledger platform account you will be using, then you should fill in the action input fields, which we describe below:
Select the Overledger Instance, Technology and Network
The possible options are listed above.
Select the Webhook Type and Address
Overledger requires you to define the specific webhook type and the address.
Overledger supports two types of webhooks:
Account: Monitoring transactions sent to or from a particular address.
Smart Contract: Monitoring events fired (emitted) from a smart contract.
You should select the webhook type you prefer and then input the address, which will be equal to the smart contract identifier, should you want to monitor a particular smart contract.
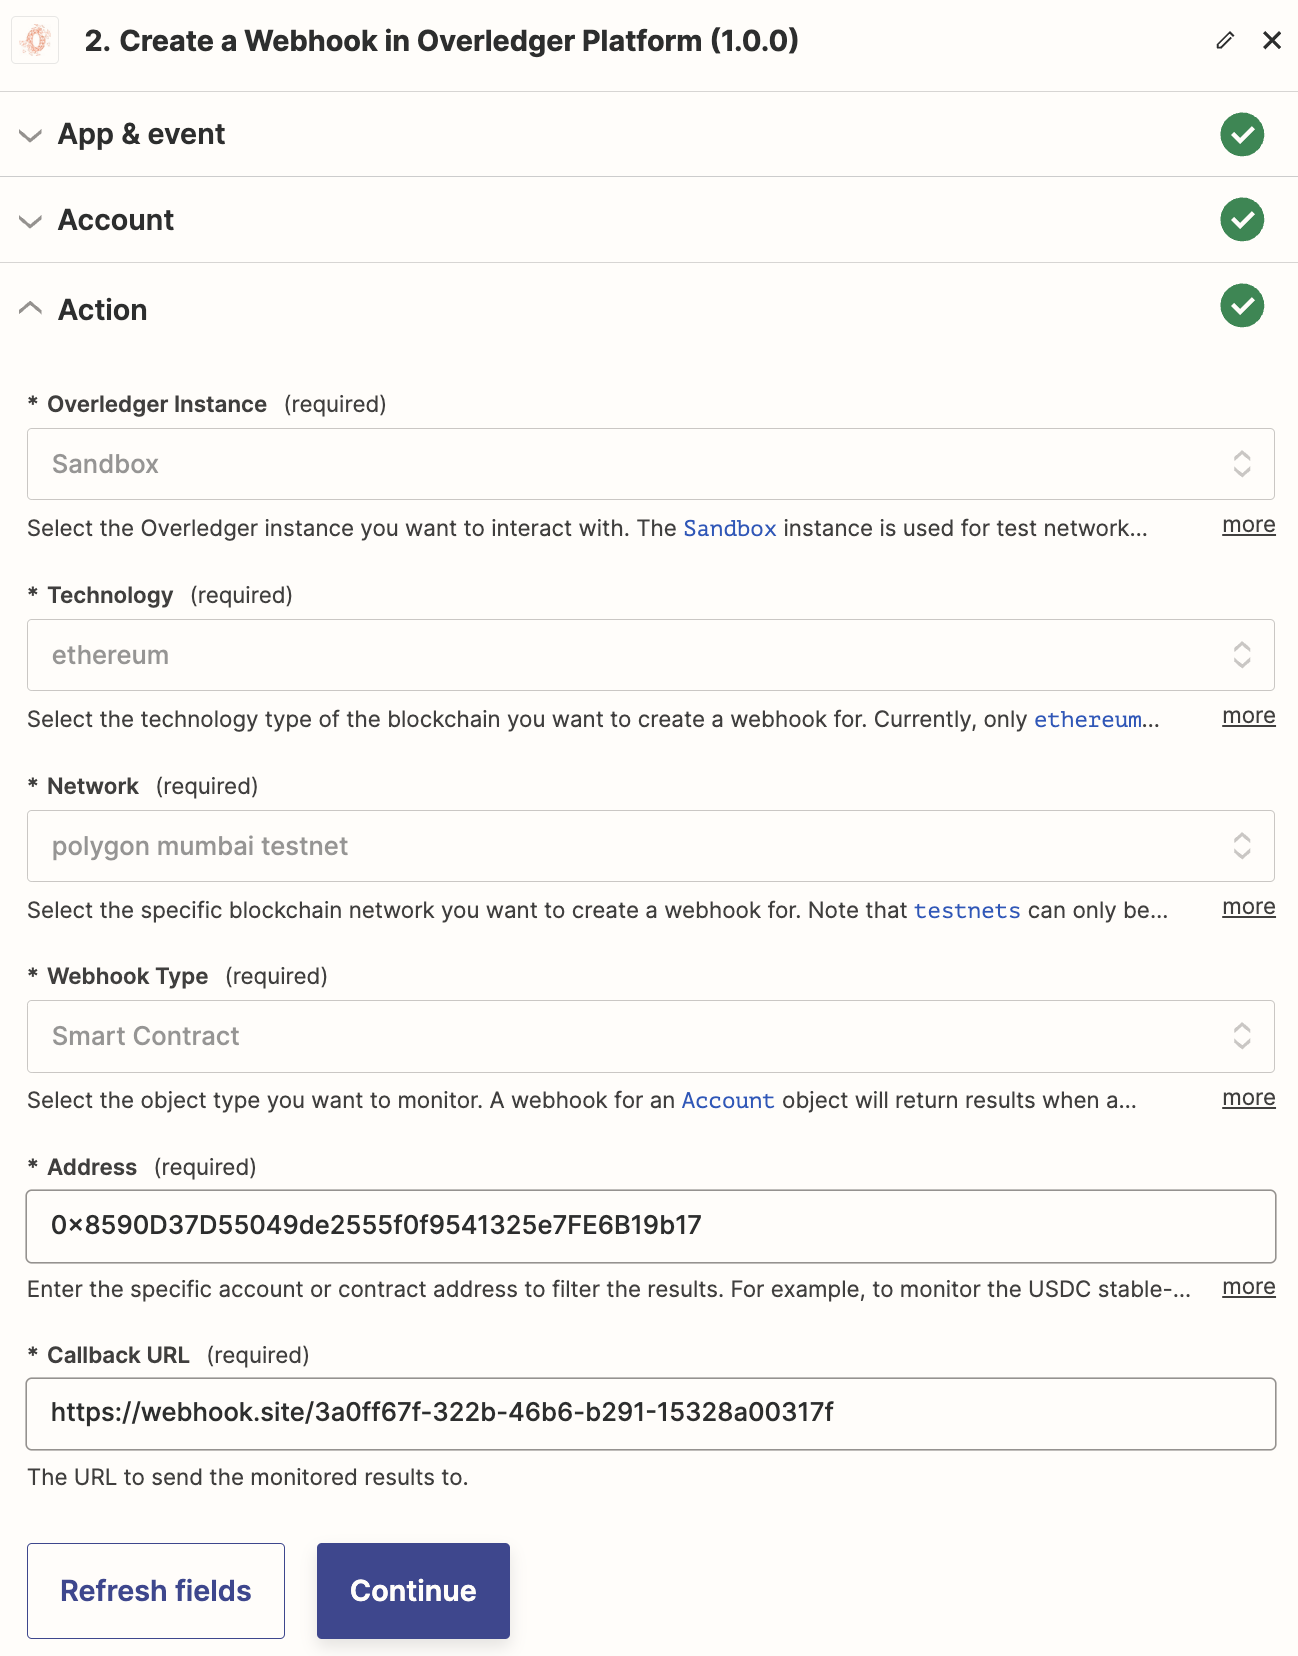
In the following examples, for the smart contract monitoring testing we will be using the 'Basic Parameter Type Event Testing Contract' deployed on the polygon mumbai network at this address 0x8590d37d55049de2555f0f9541325e7fe6b19b17.
Therefore the smart contract identifier of this smart contract is 0x8590d37d55049de2555f0f9541325e7fe6b19b17.
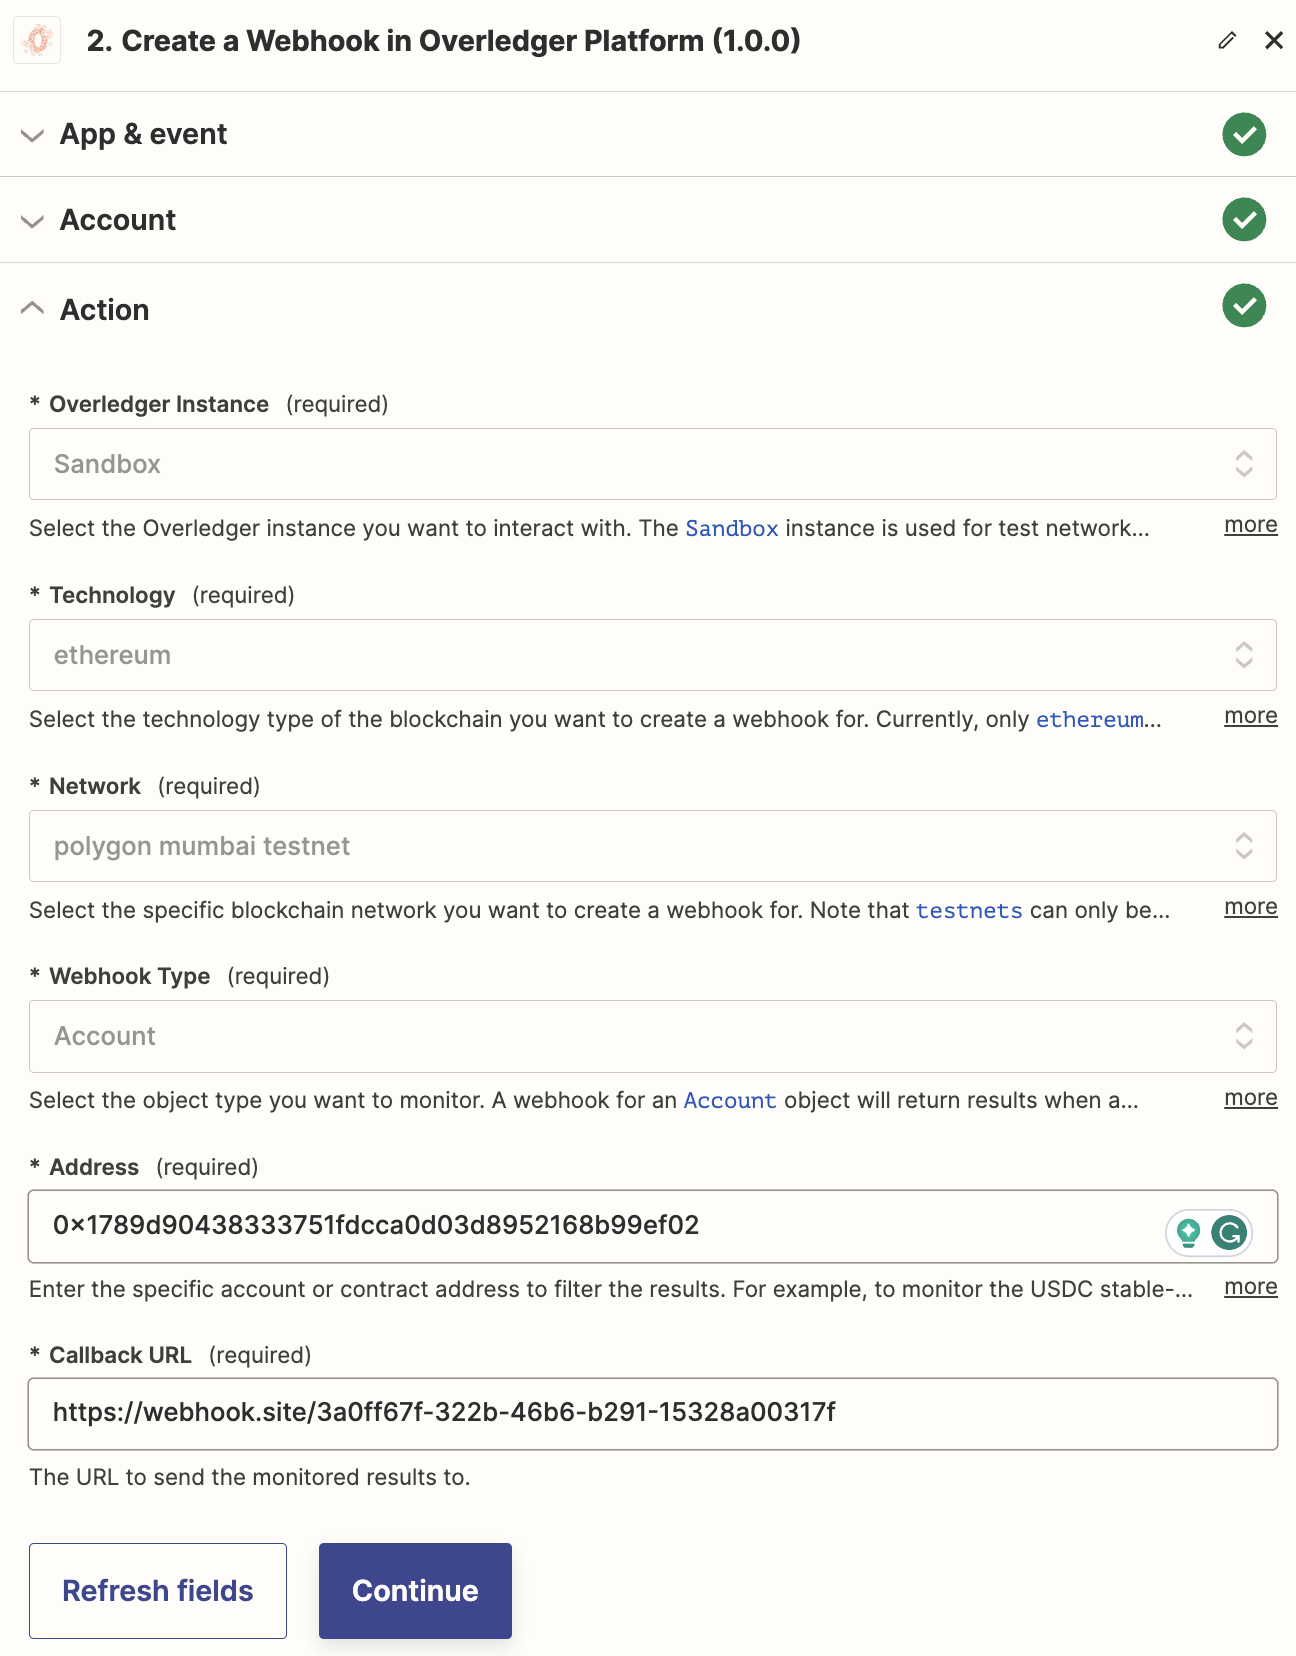
Whereas for the account testing, we will be using the non-smart contract account at this address0x1789d90438333751fdcca0d03d8952168b99ef02.
Therefore the identifier of this account is 0x1789d90438333751fdcca0d03d8952168b99ef02
Example Request and Responses
This Zapier Overledger action relates to the two different Overledger APIs found here for the smart contract webhook type and here for the account webhook type.
For our Zapier examples we present the following screenshots:
(i) Create a smart contract webhook.
Input Fields:
(i) Create a smart contract webhook. Response body:

(ii) Create an account webhook. Input Fields:
(ii) Create an account webhook. Response body:

Await callback data
Once the monitoring has been setup, Overledger will serve data as and when it occurs. To trigger this process a transaction will have to be sent to the monitored address (for the account webhook type to fire), and additionally this transaction will have to trigger a smart contract event (for the smart contract webhook type to fire).
For our Zapier examples we present the following example data:
(i) Create a smart contract webhook. callback data:
The following is example callback data received for an example webhookId when a smart contract emits an event.
{
  "type": "smartContractEvent",
  "webhookId": "6c964253-4b10-43a5-a812-9b30e92275a3",
  "location": {
    "technology": "ethereum",
    "network": "polygon mumbai testnet"
  },
  "smartContractEventUpdateDetails": {
    "smartContractId": "0x8590d37d55049de2555f0f9541325e7fe6b19b17",
    "nativeData": {
      "removed": false,
      "logIndex": 0,
      "transactionIndex": 0,
      "transactionHash": "0xde2bbf9704d726ff395eb78217e9acb226b0ecb0b609021cccd7e67d99763db2",
      "blockHash": "0x6d1a13d15fd0a90f361d3e368830bbe45c628382c4533d10f1a23ae699c781cc",
      "blockNumber": "0x28b2471",
      "address": "0x8590d37d55049de2555f0f9541325e7fe6b19b17",
      "data": "0x0000000000000000000000001789d90438333751fdcca0d03d8952168b99ef02",
      "topics": [
        "0x2d1801d4e6df986759c8582affebc974bcf0cacfd5d2ab120eb776efa53dffa2"
      ]
    }
  }
}
To parse this callback data correctly, you will need to have access to the smart contract code to understand it. Please refer to here to understand how to decode smart contract events.
(ii) Create an account webhook. Callback data:
Account callback data is simpler than smart contract callback data, making it easier to understand. Below is example callback data received for an example webhookId when a transaction is sent to or from the monitored address.
{
  "type": "account",
  "webhookId": "20f6ce08-04b4-4ce4-94eb-e2304a0737af",
  "accountId": "0x282f70d5af34aedaac479b12a08e189bbee83066",
  "location": {
    "technology": "ethereum",
    "network": "polygon mumbai testnet"
  },
  "transactionId": "0xd65c16e476a5ad5fa89ffe14512bd7984e575a4370ac86ccfb88202da20f9262"
}
Manage your webhook
Now that your webhook is up and running, through one Zapier action in the Overledger app, you can do the following:
- Read the webhook via the Read a Webhook action;
- Update it (by providing a new callback URL) via the Update a Webhook action; or
- Delete it via the Delete a Webhook action.
- Additionally, you can read all the webhooks associated with this clientId via the Read Webhooks action.
Updated 4 months ago